'%20fill='%23fff'%3e%3cpath%20d='M24%20364.337V24h141.909c25.481%200%2046.833%203.601%2064.056%2010.803%2017.222%207.191%2030.183%2017.279%2038.882%2030.24s13.049%2027.972%2013.049%2045.041c0%2012.961-2.72%2024.513-8.148%2034.645-5.429%2010.142-12.906%2018.534-22.431%2025.174-9.526%206.651-20.548%2011.299-33.069%2013.953v3.325c13.732.661%2026.451%204.383%2038.134%2011.134%2011.684%206.762%2021.077%2016.155%2028.168%2028.17%207.092%2012.025%2010.638%2026.231%2010.638%2042.628%200%2018.281-4.647%2034.601-13.952%2048.939-9.305%2014.35-22.762%2025.648-40.381%2033.908-17.607%208.248-38.992%2012.377-64.143%2012.377H24zm82.258-200.414h45.534c8.975%200%2016.947-1.497%2023.929-4.493s12.432-7.312%2016.374-12.961c3.931-5.65%205.902-12.466%205.902-20.439%200-11.409-4.041-20.384-12.135-26.926-8.082-6.53-18.995-9.801-32.738-9.801h-46.866v74.62zm0%20134.109h50.853c17.839%200%2030.987-3.381%2039.466-10.131%208.479-6.762%2012.708-16.178%2012.708-28.247%200-8.755-2.049-16.309-6.145-22.686-4.096-6.365-9.922-11.298-17.443-14.789-7.532-3.491-16.561-5.231-27.089-5.231h-52.339v81.095l-.011-.011zM388.865%2024v340.337h-81.256V24h81.256zm181.618%20230.159V109.082h81.091v255.255h-77.435v-47.529h-2.665c-5.649%2015.616-15.263%2028.004-28.829%2037.145-13.578%209.14-29.941%2013.71-49.102%2013.71-17.398%200-32.683-3.986-45.864-11.97-13.181-7.973-23.433-19.14-30.745-33.489s-11.023-31.165-11.133-50.437V109.082h81.256v146.739c.11%2013.854%203.766%2024.767%2010.968%2032.74s17.002%2011.96%2029.413%2011.96c8.082%200%2015.372-1.795%2021.847-5.407%206.486-3.601%2011.628-8.865%2015.45-15.781%203.821-6.927%205.737-15.318%205.737-25.174h.011zm224.376%20115.002c-26.704%200-49.718-5.286-69.044-15.869-19.337-10.583-34.181-25.703-44.532-45.371-10.362-19.668-15.537-43.069-15.537-70.215s5.208-49.445%2015.614-69.212c10.418-19.779%2025.096-35.174%2044.037-46.197s41.261-16.53%2066.962-16.53c18.17%200%2034.787%202.83%2049.851%208.48s28.08%2014.007%2039.048%2025.086%2019.501%2024.734%2025.591%2040.966%209.14%2034.81%209.14%2055.756v20.273H694.145v-47.199h146.226c-.11-8.633-2.159-16.342-6.145-23.104s-9.448-12.047-16.374-15.869-14.866-5.726-23.841-5.726-17.233%202.015-24.424%206.057c-7.202%204.052-12.906%209.537-17.112%2016.452-4.207%206.927-6.431%2014.757-6.652%2023.512v48.025c0%2010.417%202.049%2019.525%206.145%2027.332s9.911%2013.876%2017.454%2018.193c7.532%204.317%2016.506%206.486%2026.924%206.486%207.201%200%2013.731-1.002%2019.612-2.995%205.869-1.993%2010.912-4.923%2015.119-8.81%204.206-3.876%207.367-8.645%209.47-14.294l74.616%202.158c-3.105%2016.728-9.889%2031.264-20.361%2043.62s-24.182%2021.937-41.129%2028.743c-16.947%206.816-36.559%2010.219-58.825%2010.219l.011.033z'/%3e%3c/g%3e%3cdefs%3e%3cclipPath%20id='A'%3e%3cpath%20fill='%23fff'%20transform='translate(24%2024)'%20d='M0%200h892v345.161H0z'/%3e%3c/clipPath%3e%3c/defs%3e%3c/svg%3e)
Getting Started
Configure a model provider, access rules, and optional spend cap for your organization's AI Agent.
An organization owner or administrator can configure the AI Agent. The AI Agent is currently available on all plans.
Open AI Settings
Open Settings > AI > General.
Add a Provider Key
- Under Provider, select Anthropic, OpenAI, Google, DeepSeek, or OpenRouter.
- Under API key, enter a key from that provider.
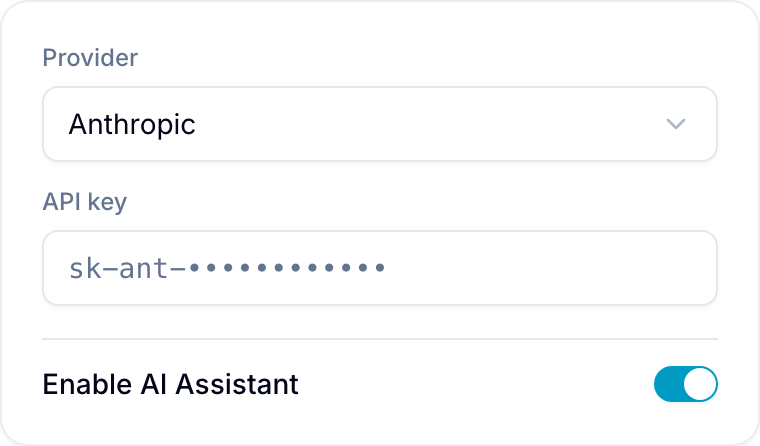
Blue encrypts the key at rest. After you save it, Blue does not display it again. You can replace the key or select Remove stored key.
Select Models
- Under Default model, select the model that generates responses.
- Optional: Under Checker model (Auto safety, optional), select the model that classifies writes in Auto mode.
If you do not select a checker model, Blue uses the default model for this classification. See Using the Assistant.
Configure Access and Identity
- Under Access, select All members or Specific users.
- Optional: Under Agent name, enter the name shown in comments and activity. The default is
Blue.
For individual access instructions, see Access Control.
Add Organization Guidance
Optional: Enter standing instructions under Organization prompt (optional). These instructions apply to AI Agent conversations in the organization.
Workspaces can append to or replace these instructions. See Workspace Prompts.
Set a Spend Cap
Optional: Enter a USD amount under Monthly spend cap (USD, optional). Blue stops new calls when the estimated monthly spend reaches the cap.
Leave the field empty for no cap. Review usage under Statistics.
Enable the AI Agent
- Turn on Enable AI Assistant.
- Select Save.
Members who meet the selected access rules can now use AI Agent.